Who put that Selenium in my Cucumber? (Or how to test the Front-end)
On every big project involving web or native apps there’s the need to test functional features from a UI perspective (beyond the scope of Unit Tests). Furthermore, this is not done just once, but within every regression or integration tests too. Tests are key to deliver good quality to the customer, which of course is one of our main focuses. But testing this by hand usually takes too much time, time in which the customer is not benefiting from your feature. Because of this, at eDreams ODIGEO (eDO) we thought of testing all our Services and Apps, and we want to share our experience in this article about the automation process of the web app with Selenium and Cucumber.
The plot
As stated before, providing new features to the customer is very important, and the faster the better. However, quality should not suffer because of this “hurry”, because at eDO we care about both. In order to deliver quality, every feature we added had to be tested in many ways (depending on the change). This meant that the more features we added on each release, the more time was needed for integration and regression tests. All the tests already had a good amount of tests plans, thus it seemed natural to move into Cucumber and automate all of them. This change gave us an incredible boost on delivery time.
The stack
At eDO we understand the front-end not only as the client side, but we include in the definition a middleware server written in Java. The server provides communication with all of the APIs we use to the client side code. Having said that, our front-end teams loves javascript (and yes, NodeJS too!) because of it’s flexibility and fast prototyping among many other things. That’s why we thought of using Cucumber–js, the javascript binding of WebDriver, ExpressJS to mock some services (like our CMS) and Grunt to manage some configurable options. The idea was to test the front-end as a black box, in which certain user interactions with the browser should get the proper changes in the page, and sometimes also certain external API calls.
Our front-end consumes lots of APIs written by other teams in the company, some of them are SOAP (XML) with pretty complex structures which make them not easily mocked with javascript. But luckily our teams not only write great APIs but also provide Java libraries to mock them. That’s why we thought of using Jetty, so we can mock APIs based on SOAP easily with a Restful interface to communicate Cucumber with them and serve a configurable mocked interface to the front-end.
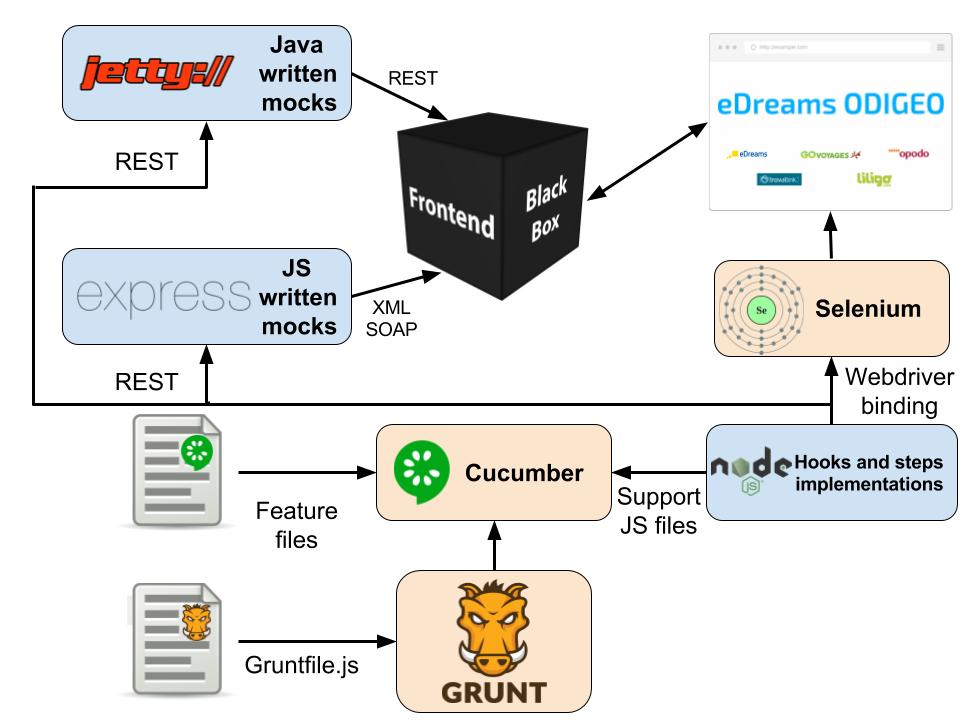
The test framework
Once we thought of the languages, tools and platform we wanted to use, it was time to start developing! CucumberJS is already more or less a framework that gives a set of hooks and utils to set up the process for each test and start implementing steps and scenarios (test cases).
- Execution command: First thing we do is execute a command that invokes grunt which has several optional arguments such as the browser to use or the features to test. Also we can provide some development mode modifiers, such as skipping the deployment process (so we can use an already deployed version of the app in our local environment).
- Deployment and startup: Right after Cucumber has started, we hook into the “BeforeFeatures” event, which is fired once before starting to execute any feature. We use this hook to start up the selenium standalone server, mocked services and also deploy the app.
- Scenario setup: The hook “Before”, however, is executed every time we test an scenario. It is mainly used to prepare all the mocked services (clean their states if they have them) and restore the initial setup. Then, we can also start the browser with the desired configuration (for example emulation parameters).
- Scenario clean: At this point the execution of a scenario has ended, so the “After” hook is executed. This hook provides the result, either if it was completed successfully or not. If the scenario failed, we need to gather the resources to study the case later:
- A screenshot of the browser at the moment of failure.
- The logs from the app, the selenium server, the browser and the mock servers.
All of the information gathered is then attached to Cucumber report. Lastly, it’s important to close the browser and clean all logs.value
- Shutdown: Finally, the last hook “AfterFeatures” may be the time to do some clean up. Stop mock services undeploy and in our case create a little resume of an average of the time taken per scenario and per feature.
Epilogue of Part 1
Summing it all up, we test the front-end as a completely independent black box, with all of its dependencies (services and so on) mocked, which helps speeding up the test process. In the process of automating we found some other challenges like dealing with page loadings (as our front-end is a SPA), scrolling and other issues, as well as randomization and mocking specifics (analytics, and so on) that will be covered in the next parts of this series of articles.